Plug-in architecture on ASP.NET Core - Dependency problems and solutions

Plug-in architecture here I mean that the application’s functionality can be extended or removed by install or uninstall plugins at runtime without the need to re-compile or re-deploy the application. Plugins are stored in a marketplace, users can find them install or uninstall them on the fly, directly in the app. This type of architecture is usually found in CMS, or ecommerce systems. We are also apply it in SimplCommerce

Plugin

Note: This picture is from the internet

Plugins can have dependencies. For example, a plugin to do payment via Stripe depends on Stripe SDK. With normal ASP.NET Core application it is not a problem, but with this plug-in architecture, it is the big challenge

First, in order to make sure that it is safe to remove a plugin, avoiding DLL hell problem, we put all the dependencies of a plugin and the plugin itself into a separate folder. When a plugin is no longer need, we can simply delete its folder. Checkout the article Modular Web Application with ASP.NET Core to see how we archive this. You can think a module is a plugin.

Second, because we want to offer installing plugins at runtime, plugins cannot be added as a project reference to the main application, so they aren’t loaded natively by the .NET Core runtime. We have to manually load them along with their dependencies.

In .NET Core dependencies are managed by adding package references, a referenced package then can depend on other packages and so on. They are all nuget packages. These nuget packages are not stored in our solution but in a global packageFolders. In Windows, it is C:\Users<username>.nuget\packages. During the complication assemblies of referenced packages are not copied to the output folder, they are tracked in the deps.json instead.

There is a flag property called ‘CopyLocalLockFileAssemblies’ in the project file (.csproj), when you turn it on, it will copy all the dependencies of the project during the compile time, including all the System, Microsoft.AspNetCore assemblies and they are too much.

So how to include only assemblies we need for a plugin? I have found 3 workarounds to archive this.

The first workaround: turn CopyLocalLockFileAssemblies on and write a custom MSBuild task to delete redundant assemblies such as System.* or Microsoft.AspNetCore.* assemblies. The downside of this workaround is that it is hard to track the list of assemblies need to delete, and the build time is slow.

The second workaround: make some treats in the project file (.csproj) to copy some particular assemblies we need. For example, the case of Stripe. In the project file, in the PropertyGroup section we add a property to store the Stripe version


<StripePackageVersion>11.10.0</StripePackageVersion>

Then in the ItemGroup we add the following 2 lines

<PackageReference Include="Stripe.net" Version="$(StripePackageVersion)" />
<Content CopyToOutputDirectory="PreserveNewest" Include="$(NuGetPackageRoot)stripe.net\$(StripePackageVersion)\lib\netstandard1.2\*.dll" />

The downside of this workaround is that we must know exactly what assemblies we want to copy and this might difficult if the dependency has other dependencies.

The third workaround is adding project reference during the development time as normal ASP.NET Core application, when development complete, we do dotnet publish on the plugin project. During the publish .NET Core will travel all dependency graph and copies all the dependencies to the output folder. Fortunately, all the assemblies referenced by the Microsoft.AspNetCore.App are not included, because they are installed when you install the ASP.NET Core runtime.

The last problem we have to resolve is the dependency versions conflicts. Because plugins don’t know each other, they can be developed at different time by different teams. Therefore, some different version of common assemblies can be used. For example, a plugin A use the version 9.3.0 of WindowsAzure.Storage, another plugin B use 9.2.0 of WindowsAzure.Storage. When we install both 2 plugins will cause version conflict. The workaround for this is that before installing a plugin, all the dependencies of that plugin must be scanned to check for the potential version conflict. If there is a conflict then the system will not allow to install that plugin.

Assembly assembly;
try
{
	assembly = AssemblyLoadContext.Default.LoadFromAssemblyPath(file.FullName);
}
catch (FileLoadException)
{
	// Get loaded assembly
	assembly = Assembly.Load(new AssemblyName(Path.GetFileNameWithoutExtension(file.Name)));

	if (assembly == null)
	{
		throw;
	}

	string loadedAssemblyVersion = FileVersionInfo.GetVersionInfo(assembly.Location).FileVersion;
	string tryToLoadAssemblyVersion = FileVersionInfo.GetVersionInfo(file.FullName).FileVersion;

	if (tryToLoadAssemblyVersion != loadedAssemblyVersion)
	{
		throw new Exception($"Cannot load {file.FullName} {tryToLoadAssemblyVersion} because {assembly.Location} {loadedAssemblyVersion} has been loaded");
	}
}

Plug-in architecture on ASP.NET Core is hard. But it is a critical feature of CMS, Ecommerce or SaaS applications. I do hope that Microsoft will have more support on this.

Read More

SimplCommerce 1.0.0-RC Available

After 2.5 years of hard work, lack of sleep, and constant coding, today we are happy to announce that SimplCommerce has reached the RC state. Unless significant bugs emerge, we will release the first version of SimplCommerce next month.

SimplCommerce

SimplCommerce is a cross platform, modularized ecommerce system built on .NET Core. It can run well in Windows, Linux and Mac. You can use SimplCommerce with SQL Server, PostgreSQL or SQLite. MySQL will be supported when its provider for 2.1 being released. Generally, you can use SimplCommerce with any databases that Entity Framework Core support. See the docs for more details on how to work with different databases.

SimplComerce has almost all the standard features of an ecommerce system such as product variations, cross-sales, related products, multi-vendors, payment, shipping, coupon, tax management etc. And with its modular architecture you can easy add your own modules for your own business. See the docs on how to add new modules

A unique look and feel is very important of every website. With SimplCommerce you can easily develop your own theme or download a suitable one from the marketplace

SimplCommerce is fully open source and completely free. No ads, no copyright remove fee. If you appreciate our works, you can donate us :)

How to get started? Super easy, download a self-contained version of SimplCommerce at https://github.com/simplcommerce/SimplCommerce/releases/tag/v1.0.0-rc pick up the Windows or the Mac version depends on your OS. Self-contained means that you don’t need to install anything to run the website. All you need to do is extract the zip file then double-click on the file SimplCommerce.WebHost.exe (Windows) or type ‘./SimplCommerce.WebHost’ and hit Enter in the Terminal (Mac). Let us know how you think.

Read More

Deploying SimplCommcere, an ASP.NET Core Application to AWS Elastic Beanstalk with Docker and PostgreSQL

SimplCommerce Beanstalk

As a .NET developer, my primary programming language is C# and Azure is the my first choice when thinking of the cloud. Recently, I have joined an interesting project that the customer requested us to use ASP.NET Core with Aurora database and host in AWS. They prefer AWS because they already have several applications there. They also want to optimize the hosting cost and prefer using open sources. Actually they requested us to develop the application in PHP, but we have convinced them to use .NET Core. We said to them that Microsoft has changed and .NET Core is awesome. It’s super fast, fully open source and can run very well on Linux, bla. bla… And finally they agreed.

EC2 was not a preferred option because with EC2 we have to manage the VM: manually setup load balancing, scaling etc. AWS Elastic Beanstalk seems to match our need. It is quite similar to the Azure Web App. However, .NET Core 2.0 along with 1.1 are only supported on Beanstalk’s Windows platform. A little disappointed.

ASP.NET Core run very well on Linux, how can we leverage that. Fortunately, Beanstalk supports deploying from docker containers. Sweet! with Docker containers, we can define our own run time environment.

AWS Beanstalk with docker is nice. Thinking about SimplCommerce. I think it is great to see SimplCommerce run in AWS and fully on open source stack: ASP.NET Core, PostgreSQL, AWS Elastic Beanstalk, Linux, Docker. So, let get started. You can also checkout the result at http://simplcommerce-test.gkbf722mcc.us-east-1.elasticbeanstalk.com (Free Tier)

First, the docker image

Although we have an automated docker build and the docker image is published on docker hub, this docker image is used for testing purpose only. To be more convenient, entity framework migration, seeding data are run automatically and it is not suitable for production.

Therefore, I have created a new docker image. You can find it in docker hub at https://hub.docker.com/r/simplcommerce/simplcommerce-eb/

Step 1: Create PostgreSQL database

For SimplCommcere we choose PostgreSQL over Aurora or MySQL because I see PostgreSQL provider for Entity Framework Core is much more stable than MySQL.

Login to the AWS Console (I am using Free Usage Tier), go to RDS and create a new PostgreSQL database. I chose Dev/Test for the use case.

In the Specify DB details screen -> Instance specification. Check the option “Only enable option eligible for RDS Free Usage Tier” and leave others options as they are. In the settings section, filling your DB instance identifier (I filled with simpldb), the master username and password.

In the step 4: Configure advanced settings. Make sure the “Public Accessibility” is Yes. You can turn it off later but for now we need to connect to it and execute some scripts. Fill your database name (I filled with simpldb) and leave others as default.

Then click on the button “Launch DB instance”. Wait for a couple minutes for the instance to be ready.

Open a PostgreSQL compliant client tool such as “pgAdmin 4”. Connect to the PostgreSQL instance you have just created. Execute Schema_PostgreSQL.sql script to create tables and StaticData_PostgreSQL.sql to insert seeding data

Step 2: Create S3 bucket

In SimplCommcere, shop owners can upload images, documents for products and categories. The rich text editor (summernote) also supports upload files. By default, SimplCommcere stores these uploaded files in the “user-content” folder under the wwwrooot.

Different with Azure Web App, in order to work in Beanstalk, the uploaded files have to be stored in an external storage like S3. Fortunately, SimplCommcere has already support this and the “simplcommerce-eb” docker image has been configured to use Amazon S3.

In AWS Console, go to Amazon S3. Create a bucket and make sure that you grant the public read access to this bucket.

Step 3: Create AWS Elastic Beanstalk application

The first thing we need is “Dockerrun.aws.json”. Please see it below.

It is quite simple. Where to pull the docker image? In our case it is simplcommerce/simplcommerce-eb, a publish repository in docker hub. Because it’s public, we don’t need to provide a credential for authentication. The container expose port 80. And the log should be written to /var/log folder of the host.

By default our containers will stand behind a nginx proxy, and it’s configured to accept request having the size of the body under 2M. But we can configure to accept bigger size.

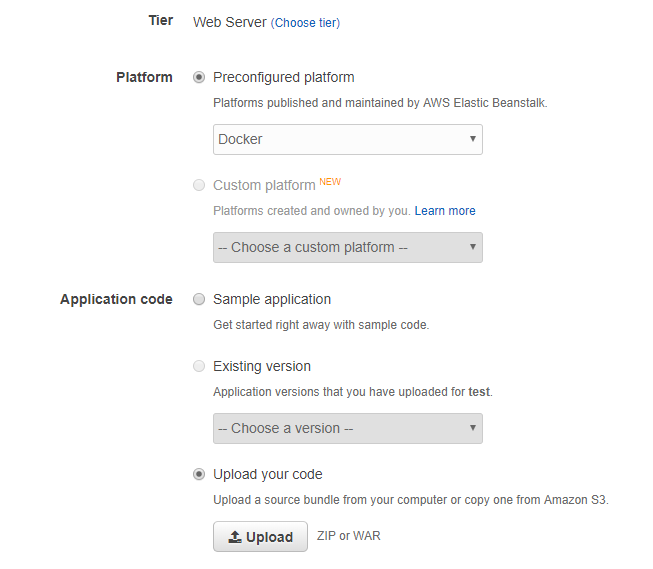
In AWS Console, go to Elastic Beanstalk, create new application. Enter application name and click create. Then create an environment (You can think environment here can be dev, test, staging, production). Choose web server environment, enter environment name. For the Platform select Docker and upload application code. You can package your own “Dockerrun.aws.json” or just use the one I have created here. Click on configure more options

SimplCommerce Beanstalk

In the software block click modify. This is where we will enter the environments which will be read by the container. We need to add the following variables:

Property Name Property Value
ConnectionStrings:DefaultConnection The connection string to your PostgreSQL database
AWS:S3:AccessKeyId Access key to S3
AWS:S3:SecretAccessKey Access key to S3
AWS:S3:BucketName The S3 bucket name
AWS:S3:RegionEndpointName The region endpoint name of S3

The connection string should look like:

User ID={};Password={};Host={};Port=5432;Database={};Pooling=true;

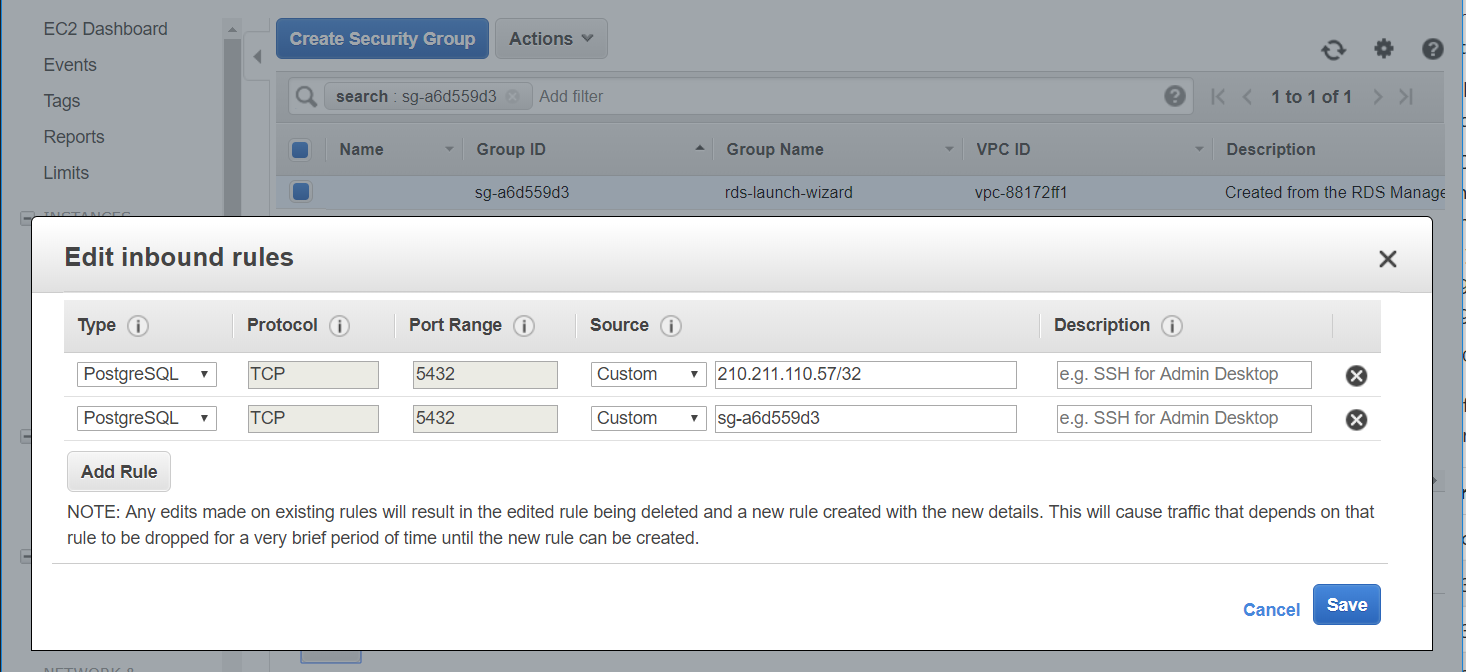
An important note is that you need to configure security for Beanstalk and PostgreSQL so that they can talk to each others. This sounds weird because the PostgreSQL already has publicly accessible.

On the AWS console, go to your PostgreSQL instance and find the security group. In my case it is “rds-launch-wizard”. Note that name, click on it, select Inbound tab, click Edit and add a new rule like the image below

SimplCommerce Beanstalk

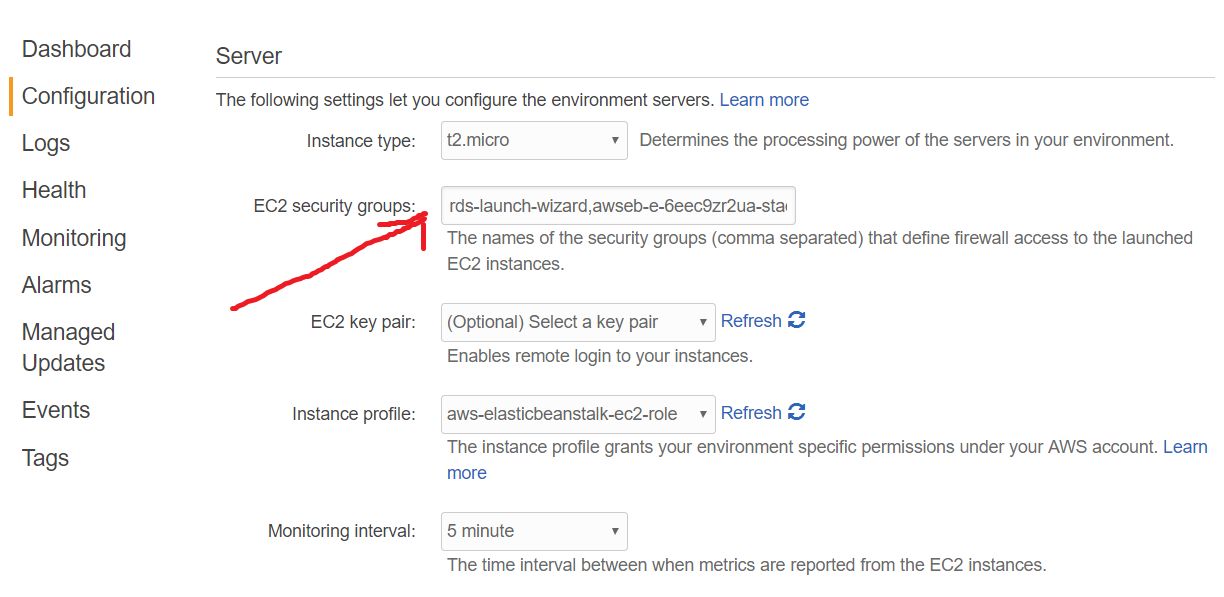
Then back to your Beanstalk application environment. Click on Configuration then the setting icon in the “Instances” block, add the security group name of PostgreSQL to the “EC2 security groups”. Then apply.

SimplCommerce Beanstalk

Congratulation! Your website is now up and running.

Read More

How did I reduce the docker image of SimplCommerce from 900M to 145M using multi-stage builds

Introduction

Always looking for better ways to do thing is one of our principles for building SimplCommerce. Last week, I made another refactoring for our automated docker build by applying multi-stage builds. We were able to reduce the SimplCommerce image size from 900M to 145M (compressed). In this blog post, I will describe how we did that.

First, let review the situation: We want to run a docker automated build for every change happens on master branch.

One of our problems is that the docker image size is quite big around 900M (compressed). Because it have to include everything so that it can build the application by itself such as dotnet core sdk, nodejs, gulp, and all the source code.

Recently, Docker has introduced multi-stage build.

With multi-stage builds, you use multiple FROM statements in your Dockerfile. Each FROM instruction can use a different base, and each of them begins a new stage of the build. You can selectively copy artifacts from one stage to another, leaving behind everything you don’t want in the final image

By applying multi-stages build I have divided the SimplCommerce Dockerfile into 2 stages:

The first stage

In the first stage, I use the simplcommerce/simpl-sdk as a base image. Basically, it is an image contains dotnet core sdk, nodejs and gulp-cli

Because the SimplCommerce source code is using MSSQL, I run some SED commands (find and replace) to make it work for PostgeSQL.

Install gulp and run “copy-modules” gulp task to copy all the modules to the host. SimplCommere is built based on modular architecture

I also need to delete all added migrations and run add migration again the because the difference between MSSQL and PostgreSQL.

dotnet ef migrations script -o dbscript.sql will generage sql script for the database schema.

Publish the website.

However, The generated sql file is utf-8 encoded which having issue when run by psql command.

The psql command gives syntax errors when fed .sql files that are saved with encoding “UTF-8” and contain a BOM (byte order marker)

  • Remove the BOM in sql script by SED commands

The second stage

The runtime only microsoft/aspnetcore:2.0.0-preview2-jessie image is used as the base. We also need to install postgresql-client in order to execute .sql scripts.

I have named the first stage “build-env” by adding an AS build-env to the FROM instruction. So, we can use that name in the COPY instructions

RUN chmod 755 /docker-entrypoint.sh to set execute permission for the docker-entrypoint.sh

When the docker run it will execute the docker-entrypoint.sh which will connect to PostgreSQL create database, tables and insert some pre-defined data if needed.

Note

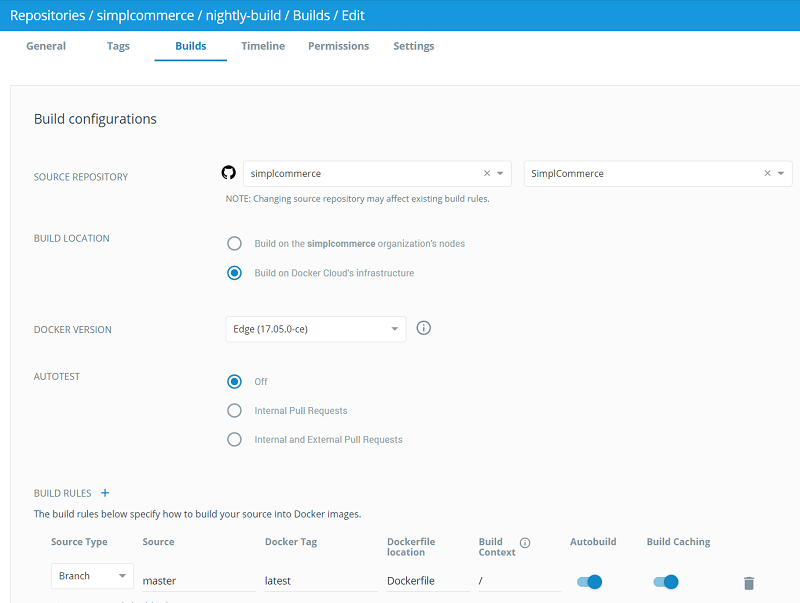
At this time Docker Hub has NOT supported multi-stage builds. Fortunately, Docker Cloud has supported it and it’s free also

SimplCommcere Docker Cloud

Read More

ASP.NET vs ASP.NET Core

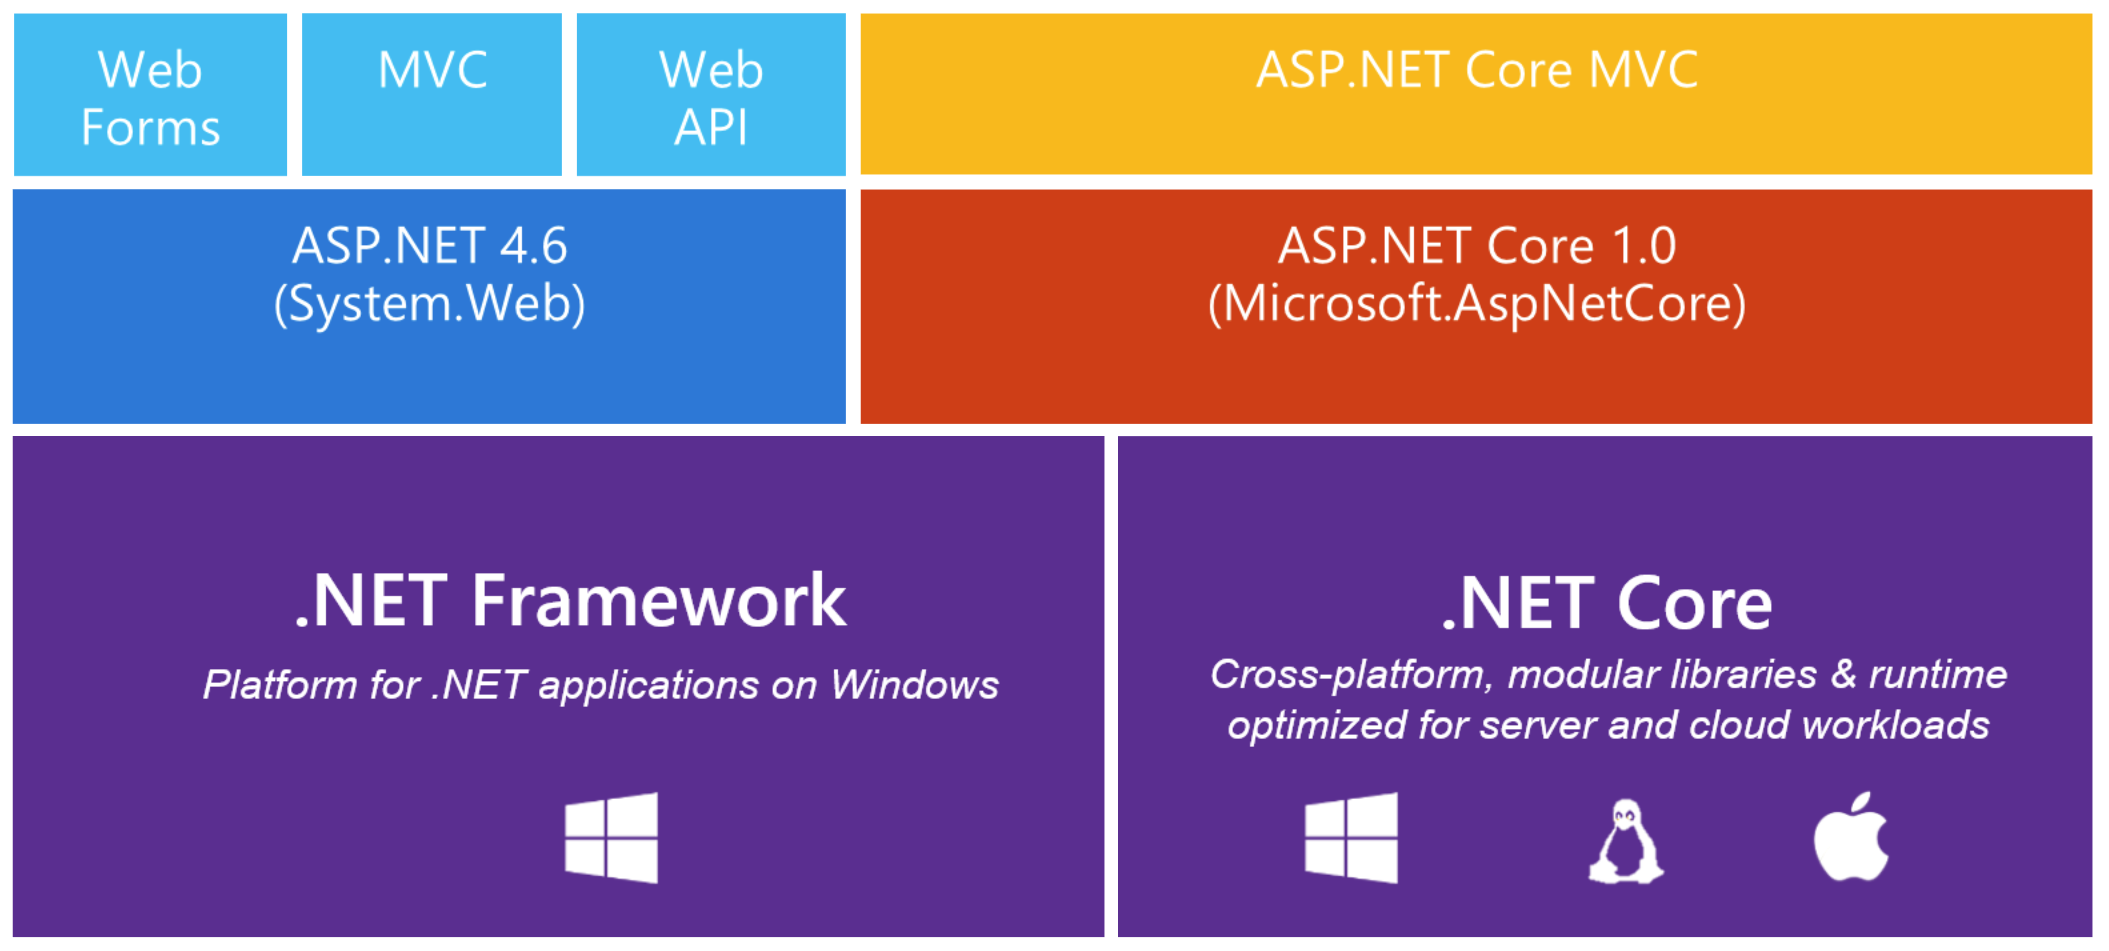
ASP.NET Core

ASP.NET Core is the next generation of ASP.NET. Many people are learning ASP.NET Core, most of them have already known ASP.NET. So I think it is good to have a summary of the different between them.

ASP.NET ASP.NET Core
IIS, Windows only Kestrel, Windows, Mac, Linux
One version per machine Multiple versions per machine
System.Web. Everything is included by default No System.Web. Everything is Nuget packages. Excluded all by default
HTTP Modules, HTTP Handlers, Global.asax Middlewares
MVC + Web API + Web Pages ASP.NET MVC Core
Web.config .json, .ini, environment variables, etc.
Child Actions (Html.Render) View Components
Request validation N/A
N/A Tag Helpers
N/A Build-in Dependency Injection
N/A Build-in Logging API and Providers
N/A Application Part
N/A Dependency injection into views
N/A A new way of localization with IStringLocalizer, IViewLocalizer
N/A File Providers
N/A WebSockets

Please let’s me know if you find out more.

Read More

Upgraded from project.json to csproj for SimplCommerce

Today, we have upgraded from project.json to csproj for SimplCommerce. It’s simple than what I have thought. In this blog post I will share you this journey.

While working with ASP.NET Core in SimplCommerce, I felt in love with project.json. It’s an innovation, modern and simple. However, in order to make the tooling compatible with other .NET app models (WinForms, WPF, UWP, ASP.NET, iOS, Android, etc.), Microsoft has decided to move .NET Core projects to .csproj/MSBuild. More detail about this can be found here.

Struggling for a while, we finally decided to say goodbye to project.json.

Goodbye project.json

Microsoft doesn’t support .NET Core csproj on VS 2015. So, to work with csproj, we need to install VS 2017 RC or go with command line. I chose to install VS 2017 RC :). I use the lasted version of VS 2017 RC which included .NET Core 1.0 SDK – RC4.

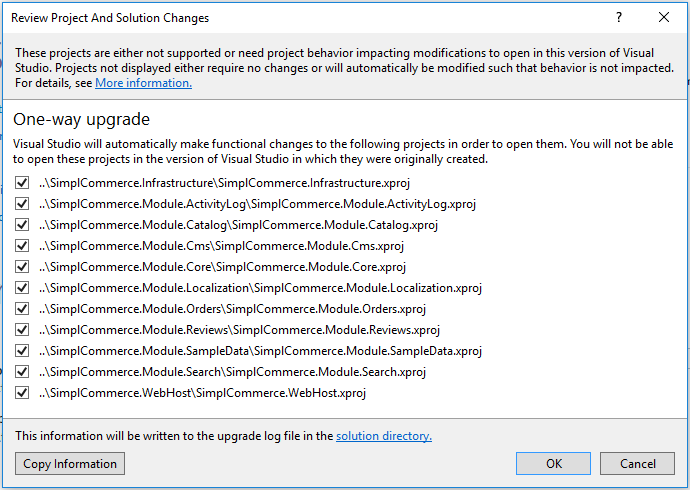
After installed VS 2017 RC. I opened the SimplCommerce.sln. VS 2017 show a dialog and ask for an upgrade. Note it’s an one way upgrade. Once upgraded, you cannot go back.

Goodbye project.json

Took a deep breath and click OK. Whoo! sucessful, the migration report show no error, there was a warning on the solution file but it not important. All the projects are loaded.

Wait “Error occurred while restoring NuGet packages: The operation failed as details for project SimplCommerce.WebHost could not be loaded.” appeared in the Output panel. None of the project can build because all the dependencies could not be loaded.

Right click on the solution and then click “Restore Nuget Package” didn’t work aslo the same error appeared. Tried to workaroud in VS 2017, no luck.

Then I opened command line and typed “dotnet restore”, enter. wow

“C:\Program Files\dotnet\sdk\1.0.0-rc4-004771\NuGet.targets(97,5): error : ‘1.1.0-preview4-final;1.0.0-msbuild3-final’ is not a valid version string. [D:\Projects\SimplCommerce\SimplCommerce.sln]”

Let find this string. It is in the SimplCommerce.WebHost.csproj

<DotNetCliToolReference Include="Microsoft.EntityFrameworkCore.Tools.DotNet" Version="1.1.0-preview4-final;1.0.0-msbuild3-final" />

It seem not correct, let remove the “1.1.0-preview4-final;”

All the projects build sucessful. Control + F5 the application run just fine.

Let take a look at what have changed.

  • All the file project.json, **.xproj was removed. The global.json is removed also.
  • The files project.lock.json are renamed and moved here obj\project.assets.json
  • The SimplCommerce.sln just change a little but and seem not important
  • The **csproj look simple and nice

So SimplCommerce has been upgraded to use csproj. There are a couple of things I want to note here:

AppVeyor hasn’t offically support .NET Core csproj. But you can request to join their beta here Travis hasn’t support also. I have submited the request https://github.com/travis-ci/travis-ci/issues/7301

And below are some useful references:

Read More

ASP.NET Core - A beginner guide

In this post I assume that you are .NET developers or at least you have known C# and you want to learn ASP.NET Core. If you are new to .NET or you’re coming from another language, I would recommend you to learn C# first. You can check out this nice tutorial to getting start with C# here

Although you might encounter some issues during the development because the tooling is not stable, .NET Core and ASP.NET Core definitely are the future of .NET. I believe that after the tooling reach RTM and with the release of .NET Core 2.0 and .NET Standard 2.0 (expected in Spring 2017), the adoption rate of .NET Core will increase significantly.

ASP.NET Core in nutshell

ASP.NET Core

ASP.NET Core is very different from the ASP.NET that you have already known. For example: there is no System.Web.dll, HTTP Modules, HTTP Handlers, Global.asax or Web.config. ASP.NET Core is a significant redesign of ASP.NET.

The most important ASP.NET Core principle I think you have to remember is the modularity. ASP.NET Core is a composition of granular NuGet packages and everything is excluded by default. That means you might need to add some packages when you need some features. And by this way you only take the minimal set of packages you need.

1. What I need to install on my PC

An IDE. In theory, you can use any editor to code .NET Core. However, I would recommend you to use Visual Studio. It’s the best IDE to code .NET. My second recommendation is Visual Studio Code. Some of my friends use Visual Studio for Mac, but I haven’t.

.NET Core SDK or NET Core tools for Visual Studio if you use Visual Studio Download here.

2. Create an ASP.NET Core project

Create an asp.net core project and take a quick look at the project structure and generated code.

3. Learn core concepts

4. Follow tutorials

It is also a good idea to getting started by follow tutorials

5. More important concepts

6. Reading code samples

Further reading

Read More

Change primary key for ASP.NET Core Identity and more

By default ASP.NET Core Identity use a string value for the primary keys. In SimplCommerce we decided to use a long value instead. We also changed the name of identity tables and run some custom code every time a user login into the system. In this blog post I am going to show you how we did it.

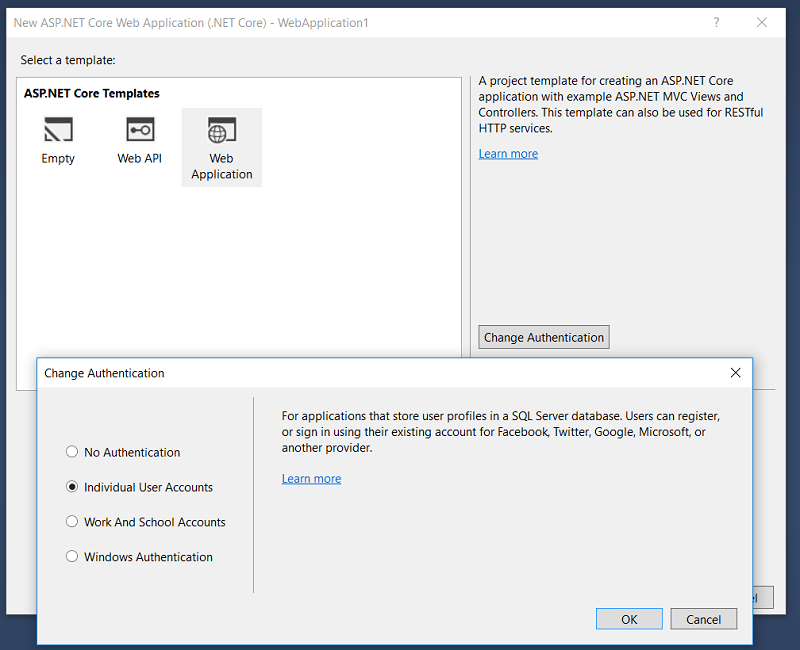
First, when creating new ASP.NET Core Web Application, in the ASP.NET Core template selecting dialog, choose “Web Application”, then click on the “Change Authentication” button, and choose “Individual User Accounts”

Create ASP.NET Core Project

The model

After the project has been created. Open the ApplicationUser.cs in the “Model” folder, you will see that it inherit from IdentityUser which then inherit from IdentityUser<string>. So we need to change that

public class ApplicationUser : IdentityUser<long>
{
}

The DbContext

We need to modify a little bit the inheritance of ApplicationDbContext. Instead of inheriting from IdentityDbContext<ApplicationUser>, it should be

 public class ApplicationDbContext : IdentityDbContext<ApplicationUser, IdentityRole<long>, long>
 

The Startup.cs

Telling ASP.NET Core Identity that we are using long, not string

services.AddIdentity<ApplicationUser, IdentityRole<long>>()
    .AddEntityFrameworkStores<ApplicationDbContext, long>()
    .AddDefaultTokenProviders();

The Migrations

We will need to re-create entity framework migration classes. Delete add the file in folder “Data\Migrations” then go to the Package Manager Console type Add-Migration CreateIdentitySchema

Bonus

If you would like to change the name of the Indentity tables, go to the OnModelCreating method of ApplicationDbContext and add custom mapping like

modelBuilder.Entity<ApplicationUser>()
    .ToTable("Core_User");

In some business cases, you might also need to run some code right after users successfully login . For example, my case in SimplCommerce. We need to migrate the shopping cart of the not login user (guest) to their real user when they loginned. We extended the SignInManager and broadcast a message every time a user login successfully

namespace SimplCommerce.Module.Core.Extensions
{
    public class SimplSignInManager<TUser> : SignInManager<TUser> where TUser : class
    {
        private readonly IMediator _mediator;

        public SimplSignInManager(UserManager<TUser> userManager,
            IHttpContextAccessor contextAccessor,
            IUserClaimsPrincipalFactory<TUser> claimsFactory,
            IOptions<IdentityOptions> optionsAccessor,
            ILogger<SignInManager<TUser>> logger,
            IMediator mediator)
            : base(userManager, contextAccessor, claimsFactory, optionsAccessor, logger)
        {
            _mediator = mediator;
        }

        public override async Task SignInAsync(TUser user, bool isPersistent, string authenticationMethod = null)
        {
            var userId = await UserManager.GetUserIdAsync(user);
            _mediator.Publish(new UserSignedIn {UserId = long.Parse(userId)});
            await base.SignInAsync(user, isPersistent, authenticationMethod);
        }
    }
}

Then register the SimplSignInManager in ConfigureServices method of Startup.cs

services.AddScoped<SignInManager<User>, SimplSignInManager<User>>();

The source code

The source code of this post can be found here https://github.com/thiennn/AspnetCoreIdentityLong

Thanks for reading

Read More

Dockerizing a real world asp.net core application

SimplCommerce on Docker

This is the second version of dockerizing simpcommerce. Read the first version to have the full story

The day after successfully dockerizing simplcommerce, I started to re-look at the approach, the code. I also received a bug report that the container fail to start again after stopping. The proudest thing of what I have done is that it only need one command to run the entire the application including the database in one container. But it revealed several drawbacks:

  • The dockerfile is big, and it take long time to build. Around 15 minutes in dockerhub
  • Postgres has its own way to initialize the container. I have extended that process to do entity framework migration, import static data and call dotnet run to launch the website. But this process only run once, after the container started for the first time, so this is the root cause of the bug I have mentioned above
  • Putting both the database and the website into one box generally is not a good practice.

I have decided to make changes. The first thing I do is separating the database and the website. For the database I use the default images of postgres without any customization.

“Separating what changes from what stays the same” is always a good practice. So it’s a good idea to separate the source code from the sdk. With this in mind I created simpl-sdk docker image. I need dotnet core 1.1 project json sdk, nodejs, gulp-cli and postgresql client. It make scene to start from microsoft/dotnet:1.1.0-sdk-projectjson then install other stuffs.

simpl-sdk Dockerfile

I created a github repository for it and went to docker hub to created an automated build repository similar to the way I did for simpcommerce earlier

SimplCommerce Dockerfile

Now the Dockerfile for simpcommerce become very small and clean. From the simpl-sdk, copy the source code into the image, restore nugget packages, build entire the projects, call gulp copy-modules to copy the build output of modules to the host. Copy and set the entry point.

The entry point

At this time the connection to database is ready. Run dotnet ef database update to run migration, and use psql connect to the database, if no data found in database then import static data. Finally call dotnet run to start the app

It looks simple and straight forward huh. But it took me a lot of time to made it run smoothly

  • First I am not familiar with writing a shell script.
  • Second, I am also not familiar with psql.
  • Third some weird differences between linux and windows.

The first error that I got when starting the container was

“panic: standard_init_linux.go:175: exec user process caused “no such file or directory” [recovered] panic: standard_init_linux.go:175: exec user process caused “no such file or directory”

What the hell is that? After some googling, I fixed by changing the line ending in the docker-entrypoint.sh from CRLF to LF. In Notepad++ select Edit -> EOL Conversion

The second error was

“docker: Error response from daemon: invalid header field value “oci runtime error: container_linux.go:247: starting container process caused "exec: \"/docker-entrypoint.sh\": permission denied"\n”.”

Something related to permission. Continue googling, then I was able to fix it by adding RUN chmod 755 /docker-entrypoint.sh before the ENTRYPOINT ["/docker-entrypoint.sh"]

Bonus - Some usefull psql commands

Connect to a server run a query and print the out to a file
echo 'select count(*) from "Core_User";' | psql -h simpldb --username postgres -d simplcommerce -t > /tmp/varfile.txt
-h: host, -d: database, -t: to get just the tuple value

Run an sql script
psql -h simpldb --username postgres -d simplcommerce -a -f /app/src/Database/StaticData_Postgres.sql'
-h: host, -d: database, -a: echo all queries from scripts, -f: file

Connect to a server
psql -h simpldb --username postgres

When connected

\l : list all databases
\c dbname : connect to dbname database

In a database

\i path.sql : exe sql
\dt : list table
select * from "Core_User"; execute a query, the semicon at the end is required, table name is case sensitive

Quick psql

\q : quick

Read More

Dockerizing a real world asp.net core application, the original version

One single command docker run -d -p 5000:5000 simplcommerce/nightly-build, waiting a couple of minutes for docker to pull the images and start the container. Then open your browser, type localhost:5000 and you got a shopping cart website written by aspnetcore up and running. Yahoo!!!!. In this blog post I will describe how I did it.

As you might know. I am developing an open source, cross platform and modularized ecommerce system built on .NET Core which called simplcommerce.

SimplCommerce

The system now has basic features of an ecommerce like: manage catalog, shopping cart, orders, review products, manage pages etc. Generally, it is enought for simple stores. Recently, many people come to ask me questions: doesn’t run on Linux? can I deploy them to a container? I think it’s a good idea to have a docker image for simplcommerce. I started to think about it. Below are 2 things that I want to archive:

  • It should be as simple as possible to for anybody who want to try simplcommerce. We have a demo site here, but it will be more interesting to have it run on local, especially in a docker container.
  • The image should be created automatically every time we make a change on the github repo.

Fascinating! But, to be honest. I am new to docker and the Linux world, I have some general knowldege but no real experience. After reseaching for a while, reading many articles, tutorials about putting an asp.net core application to a docker container. But most of them are very basic, just a hello world application. So it took me a while to figure how to dockerizing simplcommerce. Last night, finally I dit it.

Basically, challenges that I need to resolve are:

  1. How to automate this process?
  2. How to deal with database? How to run entity framework migration? How to import some static data? (simplcommerce needs some data in the database before it start)
  3. How to run a gulp task there. The simplcommerce are composed by modules and a gulp task need to be run to copy modules to the host.

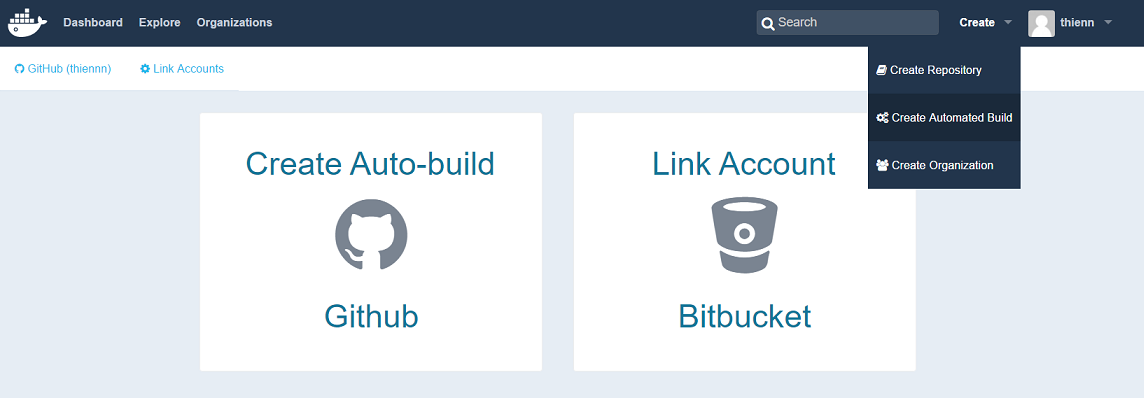
For the first challenge. In docker hub, I found that we can create “created automated build” from a github repository. Yeah, that’s cool. So, just create one and then connect to simplcommerce github repository.

Create automated build

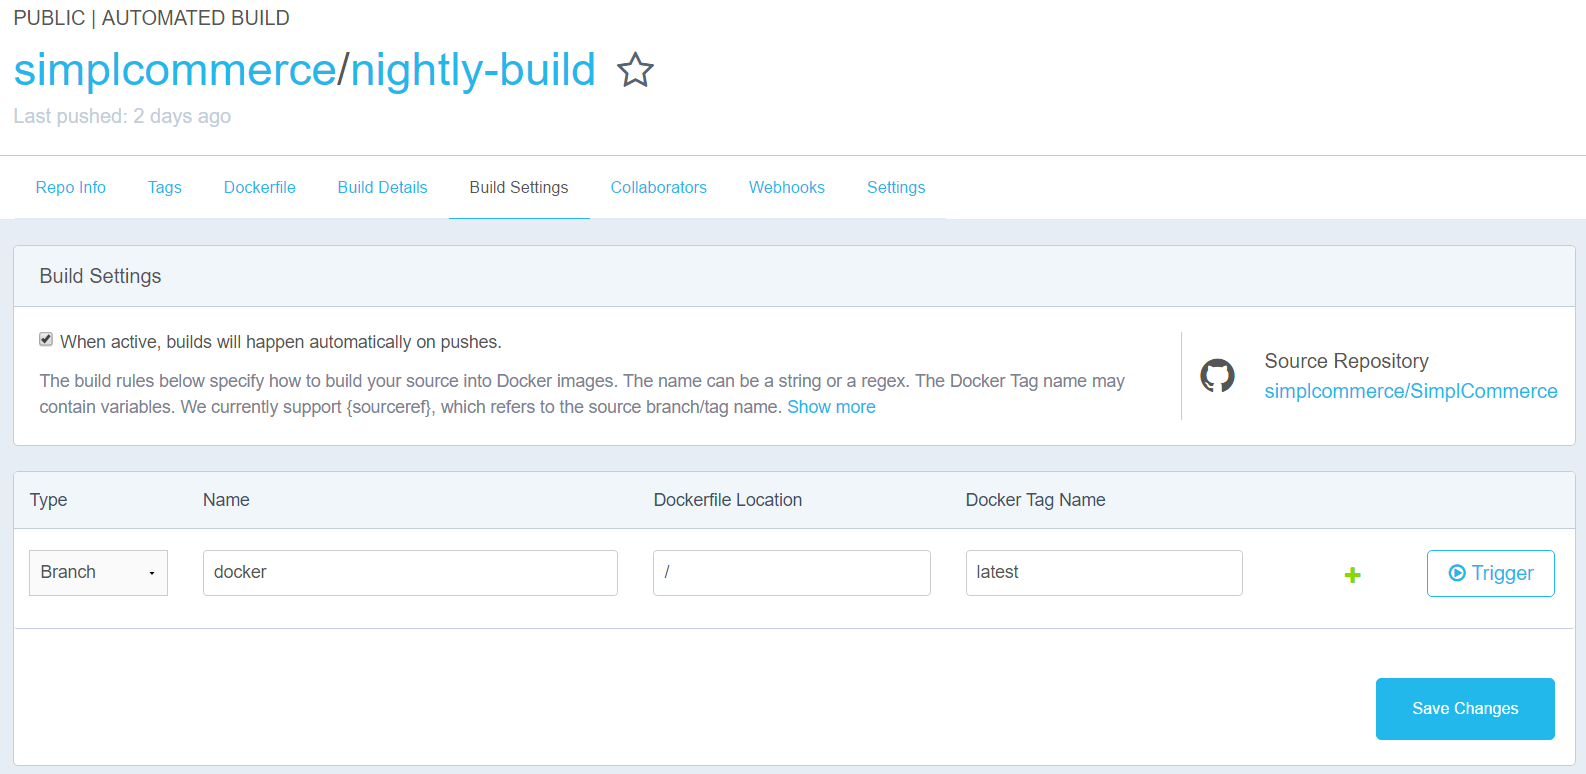
In the build setting, I check the option to make the build happen on pushes, and specify the location of the dockerfile.

Automated build setting

For the database, normally people will go with a separate container and may leverage docker compose to wire them together. But this is complicated to me :D. This is not for production so I want thing to be as simple as possible. I decided to bundle everything into one box. From the ubuntu, I installed postgres, then donetcore sdk, then nodejs. But I faced problems with staring postgres and its complidated permission mechanism. Yep! it is really complicated to a newbie as me. Getting stuck for a while. Then with using the postgres as the base image and doing more research, eventually I could make it work. The dockerfile With postgres image, we can inject custom commands to run after the database started by putting *.sh or *.sql file in a directory called “docker-entrypoint-initdb.d”. Basically the dockerfile will do the following steps:

  1. From postgres:9.5
  2. Install some stuff that donetcore sdk and nodejs depend on
  3. Install dotnetcore sdk
  4. Install nodejs
  5. Add custom commands to “docker-entrypoint-initdb.d” directory in the image. Here I use a shell script “dockerinitcontainer.sh”
  6. Copy the simplcommerce source code to the image
  7. Build the all the .netcore project
  8. Install gulp and run “copy-modules” task to copy modules to the host

After the containers started, and the postgres engine started. The file “[dockerinitcontainer.sh]” is called which will

  1. Run entity framework migration
  2. Import some static data by using psql
  3. Finally start the app.

Yeah, a real world dotnet app run perfectly on a docker container. One command to setup everything and here we go.

This is my first baby step to docker and linux, It may be not perfect. So if you can give me suggestions, I will be more than happy.

Read More