
Deploying SimplCommcere, an ASP.NET Core Application to AWS Elastic Beanstalk with Docker and PostgreSQL
As a .NET developer, my primary programming language is C# and Azure is the my first choice when thinking of the cloud. Recently, I have joined an interesting project that the customer requested us to use ASP.NET Core with Aurora database and host in AWS. They prefer AWS because they already have several applications there. They also want to optimize the hosting cost and prefer using open sources. Actually they requested us to develop the application in PHP, but we have convinced them to use .NET Core. We said to them that Microsoft has changed and .NET Core is awesome. It’s super fast, fully open source and can run very well on Linux, bla. bla… And finally they agreed.
EC2 was not a preferred option because with EC2 we have to manage the VM: manually setup load balancing, scaling etc. AWS Elastic Beanstalk seems to match our need. It is quite similar to the Azure Web App. However, .NET Core 2.0 along with 1.1 are only supported on Beanstalk’s Windows platform. A little disappointed.
ASP.NET Core run very well on Linux, how can we leverage that. Fortunately, Beanstalk supports deploying from docker containers. Sweet! with Docker containers, we can define our own run time environment.
AWS Beanstalk with docker is nice. Thinking about SimplCommerce. I think it is great to see SimplCommerce run in AWS and fully on open source stack: ASP.NET Core, PostgreSQL, AWS Elastic Beanstalk, Linux, Docker. So, let get started. You can also checkout the result at http://simplcommerce-test.gkbf722mcc.us-east-1.elasticbeanstalk.com (Free Tier)
First, the docker image
Although we have an automated docker build and the docker image is published on docker hub, this docker image is used for testing purpose only. To be more convenient, entity framework migration, seeding data are run automatically and it is not suitable for production.
Therefore, I have created a new docker image. You can find it in docker hub at https://hub.docker.com/r/simplcommerce/simplcommerce-eb/
Step 1: Create PostgreSQL database
For SimplCommcere we choose PostgreSQL over Aurora or MySQL because I see PostgreSQL provider for Entity Framework Core is much more stable than MySQL.
Login to the AWS Console (I am using Free Usage Tier), go to RDS and create a new PostgreSQL database. I chose Dev/Test for the use case.
In the Specify DB details screen -> Instance specification. Check the option “Only enable option eligible for RDS Free Usage Tier” and leave others options as they are. In the settings section, filling your DB instance identifier (I filled with simpldb), the master username and password.
In the step 4: Configure advanced settings. Make sure the “Public Accessibility” is Yes. You can turn it off later but for now we need to connect to it and execute some scripts. Fill your database name (I filled with simpldb) and leave others as default.
Then click on the button “Launch DB instance”. Wait for a couple minutes for the instance to be ready.
Open a PostgreSQL compliant client tool such as “pgAdmin 4”. Connect to the PostgreSQL instance you have just created. Execute Schema_PostgreSQL.sql script to create tables and StaticData_PostgreSQL.sql to insert seeding data
Step 2: Create S3 bucket
In SimplCommcere, shop owners can upload images, documents for products and categories. The rich text editor (summernote) also supports upload files. By default, SimplCommcere stores these uploaded files in the “user-content” folder under the wwwrooot.
Different with Azure Web App, in order to work in Beanstalk, the uploaded files have to be stored in an external storage like S3. Fortunately, SimplCommcere has already support this and the “simplcommerce-eb” docker image has been configured to use Amazon S3.
In AWS Console, go to Amazon S3. Create a bucket and make sure that you grant the public read access to this bucket.
Step 3: Create AWS Elastic Beanstalk application
The first thing we need is “Dockerrun.aws.json”. Please see it below.
It is quite simple. Where to pull the docker image? In our case it is simplcommerce/simplcommerce-eb, a publish repository in docker hub. Because it’s public, we don’t need to provide a credential for authentication. The container expose port 80. And the log should be written to /var/log folder of the host.
By default our containers will stand behind a nginx proxy, and it’s configured to accept request having the size of the body under 2M. But we can configure to accept bigger size.
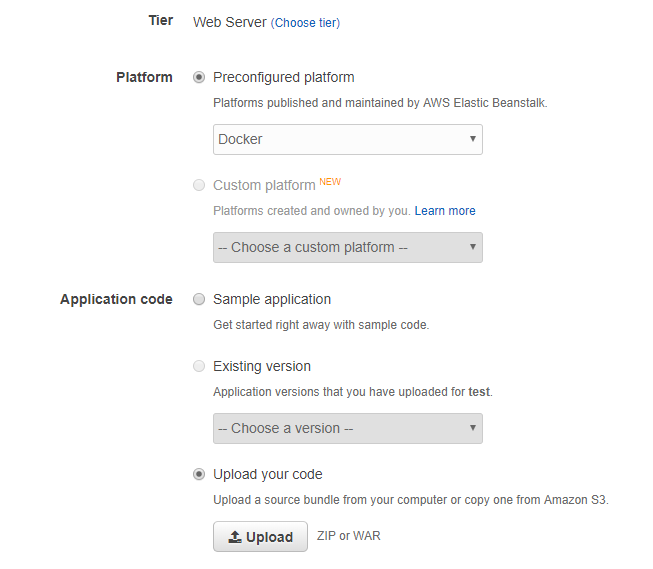
In AWS Console, go to Elastic Beanstalk, create new application. Enter application name and click create. Then create an environment (You can think environment here can be dev, test, staging, production). Choose web server environment, enter environment name. For the Platform select Docker and upload application code. You can package your own “Dockerrun.aws.json” or just use the one I have created here. Click on configure more options
In the software block click modify. This is where we will enter the environments which will be read by the container. We need to add the following variables:
| Property Name | Property Value |
|---|---|
| ConnectionStrings:DefaultConnection | The connection string to your PostgreSQL database |
| AWS:S3:AccessKeyId | Access key to S3 |
| AWS:S3:SecretAccessKey | Access key to S3 |
| AWS:S3:BucketName | The S3 bucket name |
| AWS:S3:RegionEndpointName | The region endpoint name of S3 |
The connection string should look like:
User ID={};Password={};Host={};Port=5432;Database={};Pooling=true;
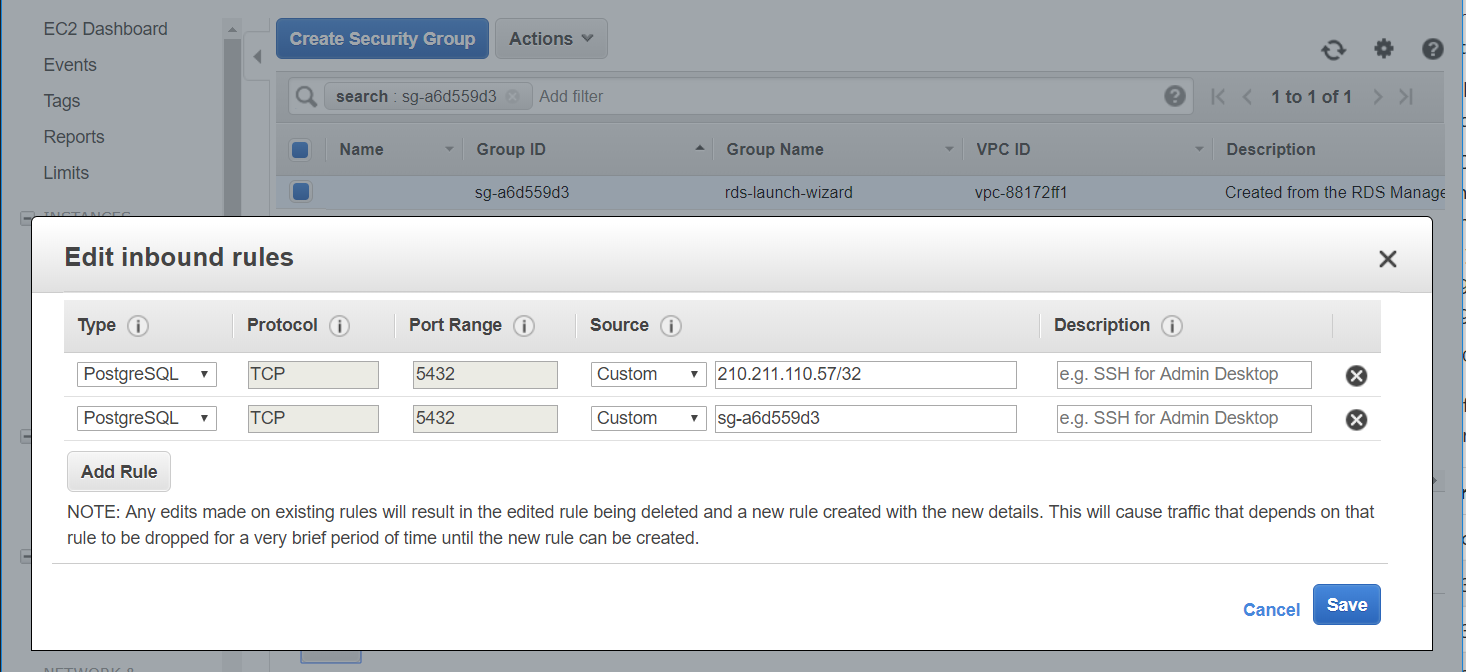
An important note is that you need to configure security for Beanstalk and PostgreSQL so that they can talk to each others. This sounds weird because the PostgreSQL already has publicly accessible.
On the AWS console, go to your PostgreSQL instance and find the security group. In my case it is “rds-launch-wizard”. Note that name, click on it, select Inbound tab, click Edit and add a new rule like the image below
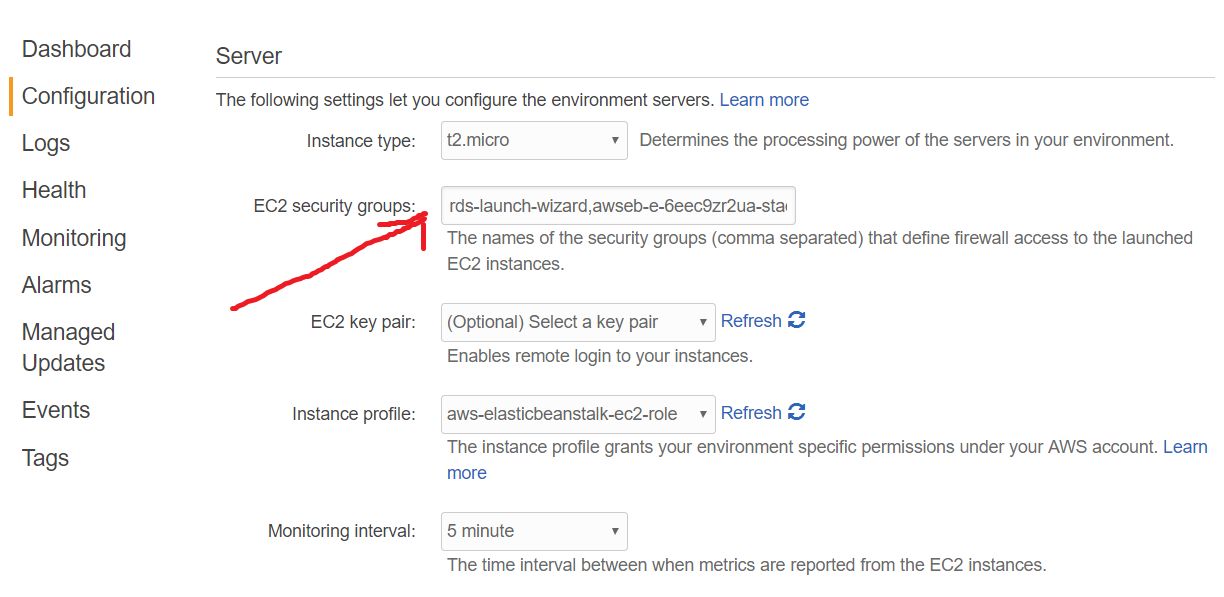
Then back to your Beanstalk application environment. Click on Configuration then the setting icon in the “Instances” block, add the security group name of PostgreSQL to the “EC2 security groups”. Then apply.
Congratulation! Your website is now up and running.